

SEO
By default the language of the blog is set to "en" in the app.config.ts file. You can change it to your language.
export default defineAppConfig({
  ...
  language: 'en'
  ...
})
Open Graph and Twitter cards
Bloggrify uses the useHead composable to add metadata to the head of the pages.
All pages have a default title and description. You can customize the image, title and description of each page in the frontmatter of the markdown file.
Auto-generated OG Images
Bloggrify automatically generates Open Graph images for your blog posts when no custom cover image is specified.
How it works:
- With a custom cover (recommended for important posts):
---
title: My Blog Post
cover: my-custom-image.png
---
- Without a cover (auto-generation):
---
title: My Blog Post
description: A short description
---
When no cover is specified, Bloggrify generates an OG image with:
- Your post title
- Description (if provided)
- The post author (when one is resolved from the
authorfield and yourauthorsconfig)
Why this matters:
- Better social media sharing (Twitter, LinkedIn, Facebook)
- Professional appearance without manual image creation
- Consistent branding across all posts
Customizing the generated OG image
Bloggrify ships a default template for these auto-generated images. Since @bloggrify/core is a Nuxt layer,
you can replace it with your own design: create a component with the same name in your project, and Nuxt
gives yours priority over the one provided by the layer.
Create app/components/OgImage/BlogPost.satori.vue:
<template>
  <div class="w-full h-full flex flex-col items-center justify-center bg-emerald-950 p-16">
    <h1 class="text-6xl font-bold text-white text-center leading-tight mb-6">
      {{ title }}
    </h1>
    <p class="text-3xl text-emerald-200 text-center max-w-4xl">
      {{ description }}
    </p>
    <p v-if="author" class="text-2xl text-emerald-300 text-center mt-10">
      by {{ author }}
    </p>
  </div>
</template>

<script setup lang="ts">
defineProps<{
  title: string
  description: string
  author?: string
}>()
</script>
Three rules to respect:
- The component must live in
app/components/OgImage/and keep the nameBlogPost, otherwise it replaces nothing. - The
.satori.vuesuffix is mandatory. It tells the renderer which engine to use, and the build fails without it. - Three props are passed:
title,descriptionandauthor.titleanddescriptioncome from the frontmatter;authoris the resolved author's name, present only when the post has one. Use whichever you need, they are all optional in your template.
Images are generated at 1200x600 and are built once at generation time, never at runtime.
display: flex explicitly.
Stick to the layout style of the example above and check the result with npm run generate.cover in its frontmatter. A post with a cover uses that
image directly and never goes through the template.Controlling indexing per page
Whether the whole blog is indexed is covered in Robots.txt. A single page can
opt out on its own with the robots frontmatter attribute:
---
title: My Post
robots: false
---
false emits noindex, nofollow. A string is passed through verbatim, which is handy when you want
to be more precise:
---
title: My Post
robots: "noindex, follow"
---
Bloggrify also keeps such a page out of sitemap.xml. Submitting a URL you have marked noindex
is contradictory, and Search Console reports it as an error.
listed: false, which only hides a page from the blog's listings and feed
while keeping it indexable. The two are independent, see
Frontmatter.Performance
Performance are an important part of SEO. Here is the lighthouse score of this blog:
| index page | blog post |
|---|---|
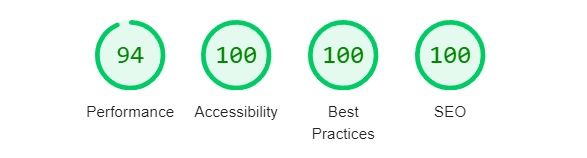 | 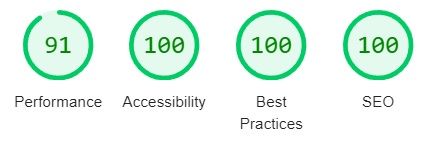 |
Performance could vary depending on the server and the network and images you use in your blog.
Schema.org
Bloggrify uses the schema.org vocabulary to add structured data to the blog and use the Nuxt SEO module to generate the metadata.
Everything is done automatically, you don't have to do anything.
When a post resolves to an author, the article's Person gains a url pointing to that author's page and a sameAs list built from the author's socials. Filling in an author's name and socials is what turns this into useful structured data.
SEO Validation
Bloggrify includes a CLI command to validate your posts for common SEO issues:
npx bloggrify validate
This command checks for:
- Missing or empty descriptions (important for search engines and social media)
- Title length (recommended max 60 characters for optimal display in search results)
- Description length (recommended 50-160 characters)
- Missing cover images (improves social media sharing)
- Missing metadata (author, tags, dates)
bloggrify validate before deploying to catch SEO issues early.The validation command is particularly useful in CI/CD pipelines as it exits with code 1 when errors are found.
Learn more about CLI commands.